Video & Sound Production: Exercises

Shema Goldie Angwen / 0372129
Video & Sound Production
Bachelor of Design (Hons) in Creative Media / Taylor's University
Exercises
CONTENT LIST
MODULE INFORMATION BOOKLET
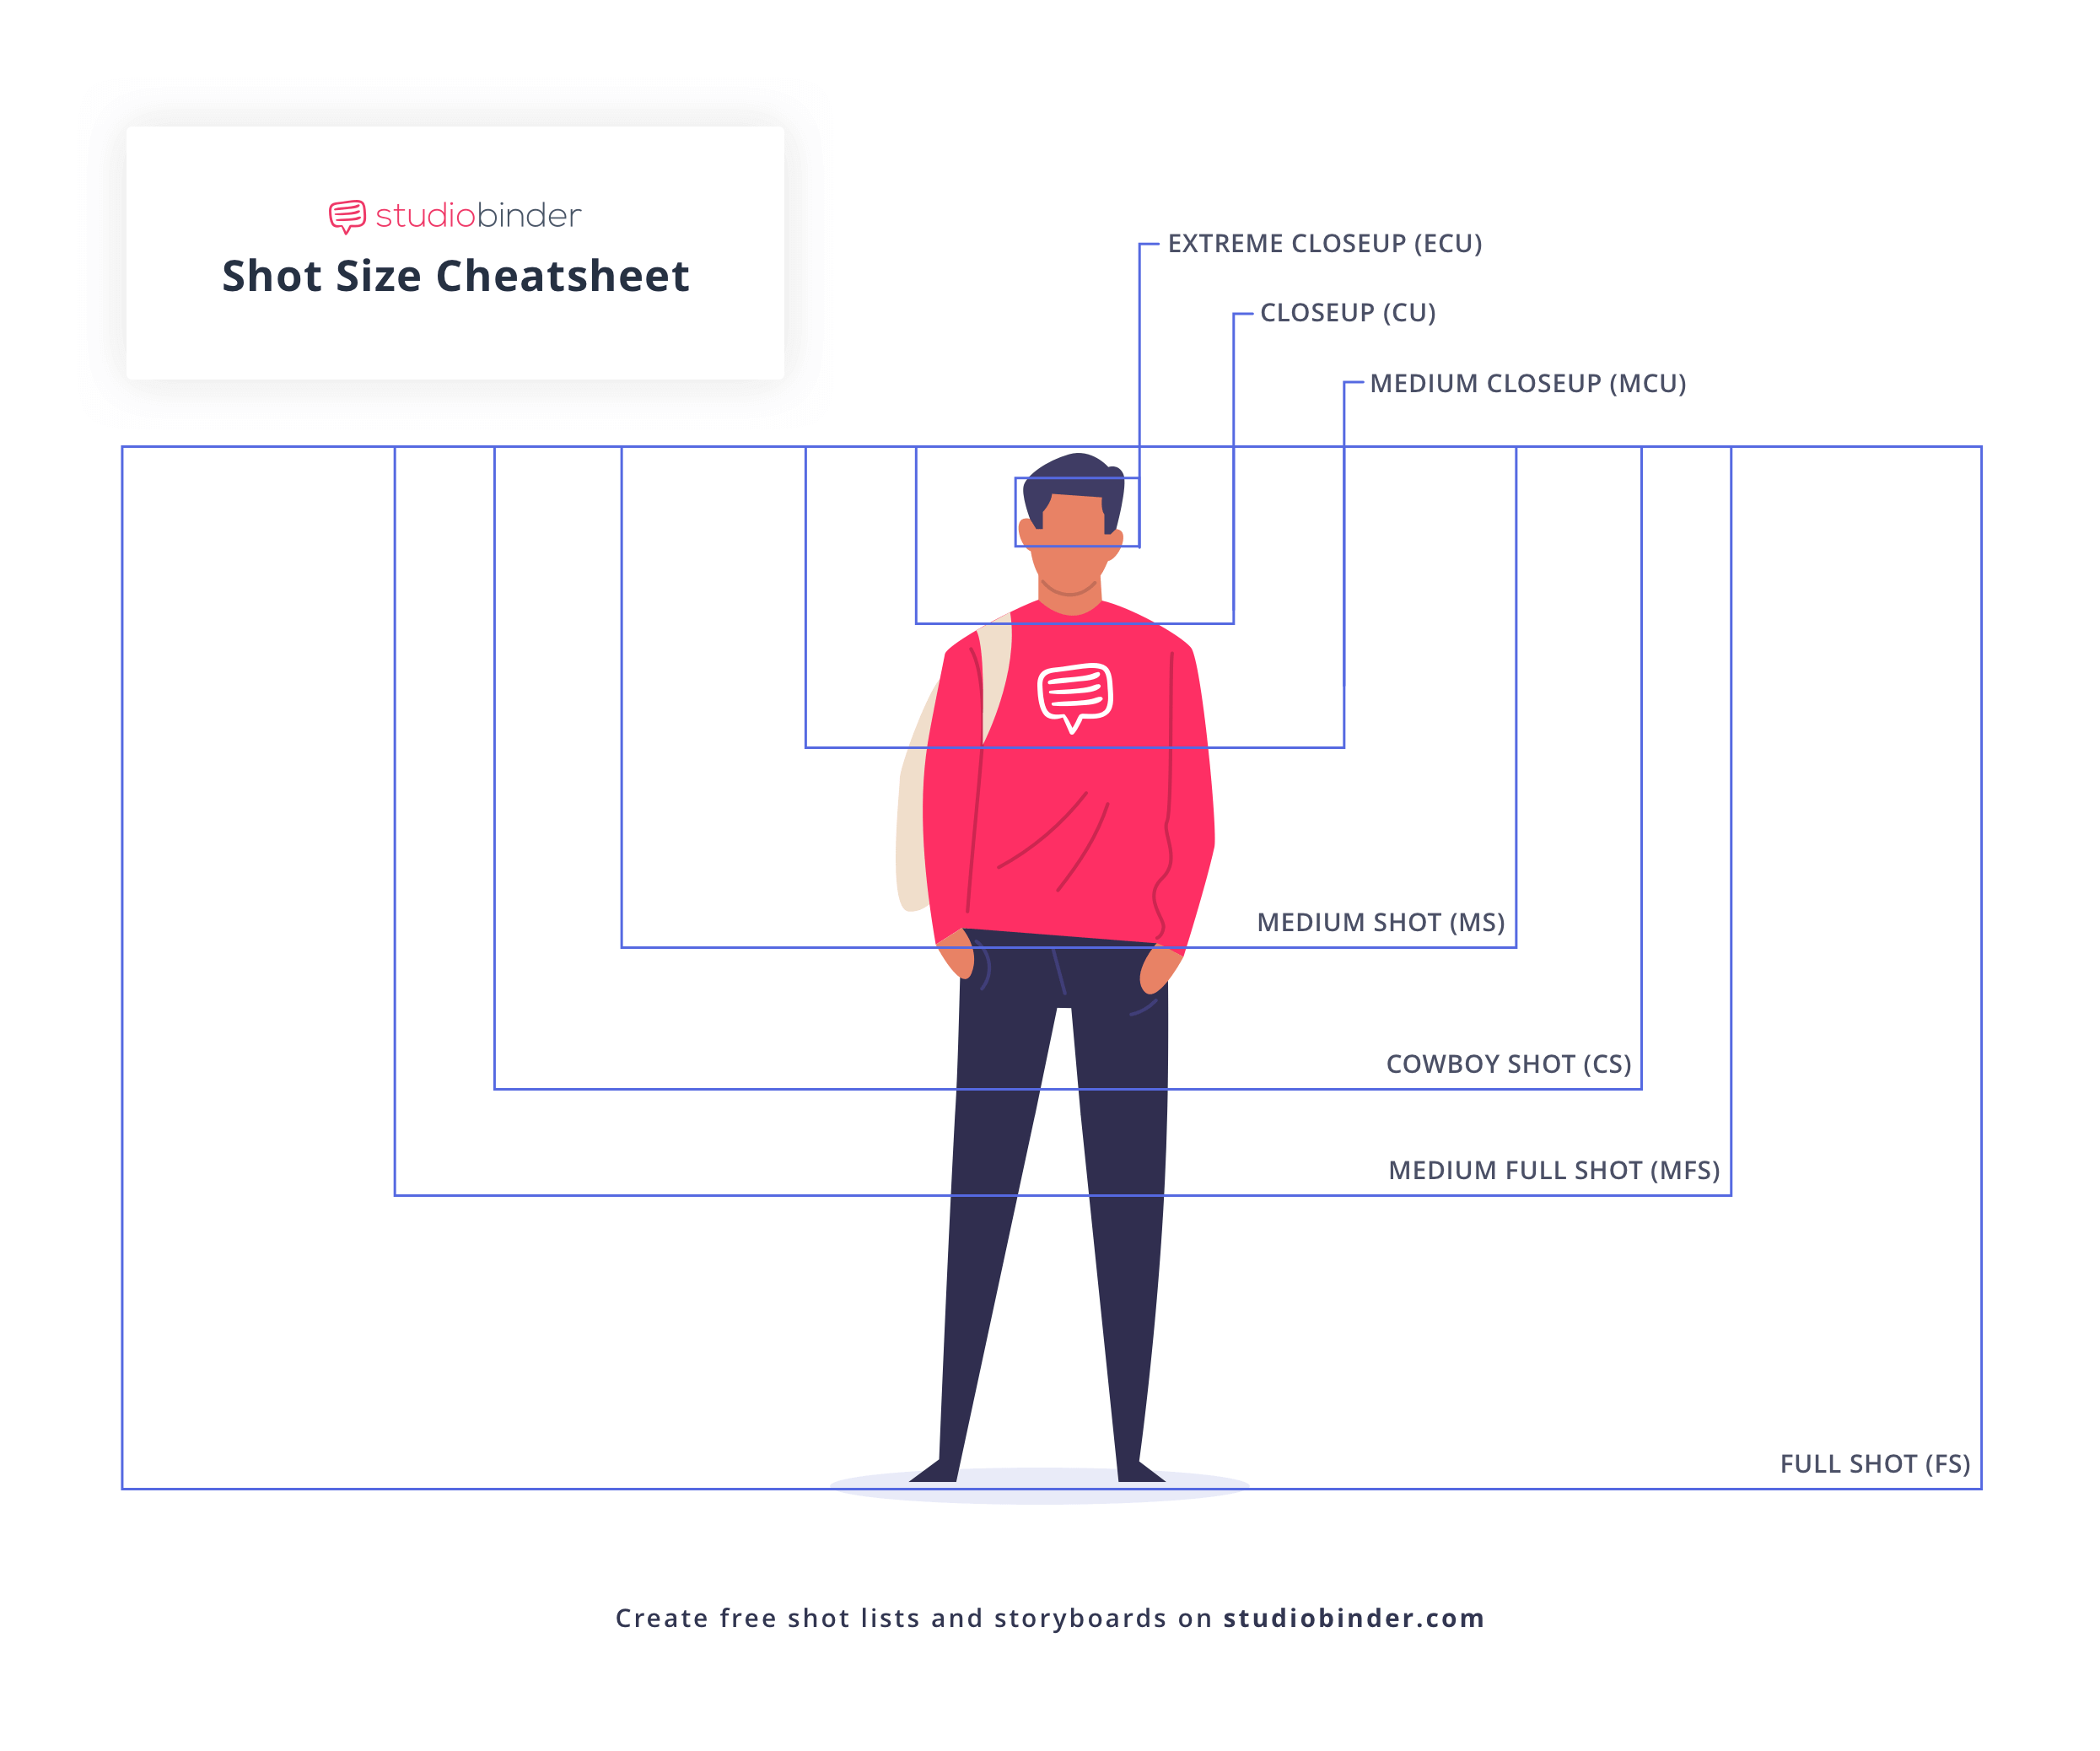
- The most common visual element to open a scene.
- Wide enough to establish the geography, time of day, show the scale of subjects in relation to their environment.
- Often used to transition between scenes.
- Often followed up with a master shot
- Like the establishing shot, a master shot confirms the location and geography of the scene.
- Also clarifies which characters are in the scene and where they are in relationship to each other. (emphasize the relationship)
- Captures the scene playing out in its entirety.
- If your subject is a person, then his/her body will be in view, but not filling the shot.
- There should be a good deal of space above and below your subject.
- Gives the viewer a better idea of how the character fits into the area.
- Positions subjects far from the camera to visually represent their relationship to their environment.
- Principally concerned with the scale of the subject.
- Can be used when you need to make subjects appear lost, lonely, overwhelmed, or comment on a subject relationship to their environment.
- When a subjects entire body reaches from the top to the bottom edges of the frame.
- It is not necessary to put the subject in the center of the frame.
- Used when you need to make statements about a subjects physicality and present a character.
- Arranged from the top of the subject's head to just below their waist.
- Referred to as a cowboy shot based on the height of gun holsters.
- Used when you need to present a subject as confident, dangerous, or confrontational especially when weapons might be drawn.
- The most popular/common shot size in all of the cinema.
- Frames from roughly the waist up and through the torso.
- Capture subject in a size similar to how we interact with people.
- The typical composition of medium shot starts above the waist but below the chest and ends just above the head.
- Used when you need to dig into a subject's eyes without losing their physicality or environment or utilize a true middle ground approach.
- Frames the subject from mid-chest to just above their head, typically favors the face, but still keeps the subject somewhat distant.
- About reducing distraction and prioritizing story and character details.
- Used when you need to get intimate with a subject without losing their physicality.
- Most often arranged at eye level.
- To reveal a subject's emotions and reactions.
- Perfect for important moments, about emphaty and illustrates how dramatically effective it can be in a time of decision or anxiety.
- Near enough to register tiny emotions, but not so close that we lose visibility.
- Frames a subject to isolate a specific area (could be eye, lips, nose)
- To highlight something crucial to the narrative
- Greatest tools for emphasis
- Make your subject appear small against their location.
- Used to make your subject feel distant or unfamiliar.
- Can also make your subject feel overwhelmed by its location.
- Used when you need to emphasize the location or isolation.
- Frames the subject from roughly the knees up.

- Features one character in a frame for primary focus
- 2 way to frame a single:
- Clean Single: no part of any other character is visible in frame
- Dirty Single: include a limited presence from another character in the frame
- Two characters visible together in frame.
- Both faces must be clearly visible.
- About creating visual relationship between two characters.
- More characters are added to the frame
- A hybrid between a single and a two shot.
- Get perspective from both sides and a sense that we are included in the moment.
- Shows the viewer exactly what that character sees.
- Cover a wide range of perspective: a person, an aliens, a camera, a disembodied spirit, or even a shark.
- Often paired with POV audio
- Going extremely tight on a detail, a way information is framed.
- Can also be combined with POV shots, a first-person perspective or third-person perspective
- Similar with the OTS that the camera is placed with a character's hip in the foreground, and the focus subject in the plane of acceptable focus.
- Any shot that finds itself below a subjects eyeline looking up at them
- Used to make a subject look more powerful (pump the character up)
- The degree can be subtle or extreme
- Can beat the character down, making them appear week.
- An extreme variation of the high angle is the aerial shot, typically used to establish the environments, cities, landscapes, or to present characters moving through a larger world.
- When high angle approach 90 degrees above the subject.
- Camera directly above the subject, shooting straight down.
- Great for showcasing complex movements, could suggest a connection to the divine, or to capture the horrific details of a crime scene.
- Skews the horizontal axis of the frame.
- Can create a sense of unease, mania, terror. Also can be used to magnify tension.
- Most commonly used, the most natural height to regard a character.
- The runner-up of the commonly used angle shot.
- Often used during conversation and frequently become an over the shoulder shot (OTS).
- Can also emphasize the height difference which translate visually to a power difference.
- Often inconjuction with the cowboy shot.
- When your camera is roughly waist-high.
- Sees the camera placed at a subject's knee height.
- A great way to track through an environment by following a character.
- A good way to showcase character details that might be missed in a wider shot.
- Finds a camera placed all the way down on the ground, sometimes even slightly below ground.
- A way to track a character's movement through a scene.
- the most common camera framing techniques used in film or photography
- about positioning a character to show their relation to other elements in the scene
- as the camera frames your shot, keep the image on the intersecting lines
- Points of Interest lie on the Intersecting Lines

- Shooting a perfectly symmetrical shot, breaking the rule of thirds, used for very specific reason which is to direct viewer's eye to a specific place, leading eye to the center of the screen

- The way the director moves actors in a scene
- Leading eye of the view should be your priority in every scene you frame.
- Often uses leading lines to control what the audience sees, and how they see it.
- Actual lines (or sometimes imaginary ones), that lead the eye to key elements in the scene.
- Artists use this technique to connect the character to essential objects, situations, or secondary subjects.

Shot Sizes - Additional Notes mentioned by Mr. Martin
- Medium Shot: Frames the subject from the waist up, with a little space above the head.
- Close-Up: Shows the subject from the mouth to mid-forehead (no hair is visible).
- Medium Close Up: Includes a bit of the shoulder and part of the forehead.
- Extreme Close Up: Focuses on a very small detail, for instance such as the eyes.
- Medium Wide Shot/ Cowboy Shot: Frames this subject from the knees up.
- Wide Shot: Show the subject's full body.
- Over the Shoulder Shot: Captures the subject from behind another person's shoulder.


Act two: rising action, midpoint, turning point into act three (often a “dark night of the soul”)
Act three: pre-climax, climax, denouement


- the opening of a film must answer one question above all else "Why should the audience keep watching?"
- serve as a taste of what's to come
- the first moment when they brush up against what will be the main conflict for the first time
- a big moment in the story, the threshold of no return
- culmination of the first act
- the first of many obstacles a protagonist must face in the second act
- sets up the coming midpoint
- can be considered the second plot point
- occurs halfway through a film
- has major ramifications on story/ a big moment in any story
- massively turns a plot
- function similarly to the first pinch point
- emphasizing the antagonistic force
- setting up what's going to happen at the third plot point
- a chance to emphasize what the characters really stand to lose if they continue down this path
- ushers the story into its final act
- false victory followed by the low moment
- the moment where the character takes everything they have learned in the second act and throws all their resources at their plot goal at the antagonistic force and trying to overcome those last obstacles and reaches this false victory. the victory is not the final push that is necessary to actually get through
- often can be character's darkest hour
- the ultimate culmination of the story
- final confrontation between protagonists and antagonistic force
- Traditional: basic pencil sketches that include detailed information like arrows for camera movement, characters, props, etc.
- Thumbnail: don't have any writing, referring to the image.
Production stages
1. Pre-production: the planning stage of filmmaking, where all the necessary preparations are made before filming begins (writing the script, creating storyboards, casting actors, scouting locations, designing sets and costumes, and hiring crew members).
2. Production: the stage where the actual filming takes place. The production team will work together to capture all the footage needed for the film, using the plans and preparations made during pre-production as a guide.
3. Post-production: the stage where the footage is edited and assembled into a final product (includes tasks such as cutting and arranging scenes, adding music and sound effects, colour grading, and visual effects).
After post-production, the film may go through additional stages such as distribution and marketing, but these are not considered part of the production process.
Production Crew1. Director: Responsible for overseeing the entire production and ensuring that the creative vision for the project is realised. They work closely with the cast and crew to block out scenes, direct the actors' performances, and make creative decisions about the look and feel of the film.
2. Producer: Responsible for the logistical and financial aspects of the production. They secure funding, hire the crew, coordinate the schedule and locations, and ensure that the project is completed on time and within budget.
3. Cinematographer/ Director of Photography (DP): Responsible for the visual aesthetic of the film. They work closely with the director to choose the right camera, lenses, and lighting to achieve the desired look and mood for each scene.
4. Production Designer: Responsible for the overall visual design of the film (the sets, costumes, and props). They work closely with the director and cinematographer to create a cohesive and immersive visual world for the story.
5. Sound Designer: Responsible for the audio aspects of the film (recording and editing dialogue, sound effects, and music). They work closely with the director and editor to ensure that the sound and picture are seamlessly integrated.
6. Editor: Responsible for assembling the footage into a coherent and compelling story. They work closely with the director and sound designer to shape the pacing, tone, and structure of the film.
There are many other roles on a production crew, including grips, gaffers, makeup artists, and stunt coordinators, but these are some of the key positions and tasks involved in the filmmaking process.
- a French term that translates literally to "placing on stage."
- It’s what we see onscreen — all the elements that appear on camera, how they are arranged, and the overall look and feel they combine to convey.
- Setting and Location:
- Physical Space: The environment where the action takes place
- Time Period: The era in which the story is set, influencing costumes, props, and set design.
-
Props and Objects:
- Items used by characters or present in the scene that can symbolize themes, indicate character traits, or advance the plot.
- Costume and Makeup:
- What characters wear says much about the world they inhabit, who they are within the world, how they feel, and how they carry themselves.
-
Lighting:
- Create mood, highlight specific elements, and guide the audience’s focus.
-
Composition and Framing:
- How elements are arranged within the frame or on stage affects how the audience perceives relationships and power dynamics.
-
Performance and Acting:
- The actors’ physical movements, facial expressions, and interactions contribute significantly to the mise en scène, conveying emotions and subtext.
-
Color Palette:
- The selection of colors used in costumes, sets, and lighting can evoke specific emotions or symbolize thematic elements. Its role in creating mood or effect, its function in art of any kind, cannot be overestimated.
-
Spatial Relationships:
- The distance and arrangement between characters and objects, which can indicate intimacy, conflict, or hierarchy.
Original colors are known by the acronym ROYGBIV:
- red
- orange
- yellow
- green
- blue
- indigo
- violet
- Monochrome color: utilizes varying tones of just one color (usually gray).
- Analogous color: utilizes colors that are next to each other on the color wheel.
- Complementary color: utilizes colors that are colors that are opposite to one another on a color wheel.
- Triadic color: utilizes colors that connect together on a color wheel to form an equilateral triangle.
- Tetradic color utilizes colors that connect together on a color wheel to form a rectangle.

- Color correcting: the process of correcting (or fixing) colors in a video or a film as a way to get them back to what they should look like for your project.
- Color grading: is the process of grading (or editing) colors in a video or film as a way to give them a stylistic look.
- Usually done first because raw footage tends to be oversaturated and the colors need to be balanced out.
- The real end goal of color correction is simply to make sure footage looks exactly the way the human eye sees things. For example, if the white and black levels match what the human eye sees as white and black, then the rest of the colors should be balanced as a result as well.
- Normalize your footage as much as possible.
- Fix your saturation first. Normalize your saturation levels to avoid colors that are too flat/ too rich. (Use Lumetri Color Tool in Adobe Premiere Pro)
- Then fix your brightness and contrast to create a natural tonal range.
- Set the correct white balance by increasing or decreasing the temperature.
- Double check your skin tones.
Color Grading
- Where you can actually begin to create the aesthetic of your videos.
- Help convey a visual tone or mood to heighten the narrative. For example, you might want to use higher contrast and darker tones for a horror film, or inverted colors for a sci-fi shootout, as depicted in this fun video showcasing some different grade effects
- Decide on the desired look and style that you want to achieve with your colors.
- Make your color adjustments, usually by applying a LUT and making minor tweaks.
- Double check your skin tones to make sure everything is just right.
EXERCISES
WEEK 1
We were given some footage to download and use for practice in Adobe Premiere Pro. This task was given in order to help new learners become familiar with the Adobe Premiere Pro workflow.
The first step is to download the footage provided by Mr. Martin in Google Drive. Then, go to Window > Workspace > Assembly. Then, import all the media files that we have downloaded.
For inputting the very first video, simply drag then release/ drop it to the timeline. Then, for inserting the second video and so on, Mr. Martin taught us two ways to precisely add them after the previous clip. The first one, manually zoom in and out the timeline by adjusting the two buttons at the bottom. Then, place the blue playhead, which is the time indicator, exactly at the end of the previous clip, and then click either insert or overwrite. The second option, we can use the up or down keys on our keyboard to move the playhead. This will automatically place it right after the previous footage.

Here is the outcomes:
2.2: First Exercise Outcome (Mints)

Here is the outcomes:
 2.5: Asynchronous Class Quiz Result


2. What is the inciting incident in the movie?
3. What is the midpoint scene in the movie?
4. What is the Climax scene in the movie?
5.What is the theme of the movie?
Act one:
3. What is the midpoint scene in the movie?
4. What is the Climax scene in the movie?
It happens when Evelyn chooses to confront her daughter, Jobu Tupaki, with love and compassion instead of fighting. Her act brings Joy out of her darkness, healing not just their own world, but the entire multiverse. This moment is not just a typical emotional scene, but an actual breakthrough.
5.What is the theme of the movie?


REFLECTION
ExperienceObservation
During the exercises and class sessions, I observed how framing, shot size, camera movement, and sound plays a crucial role in video making. I noticed that even small adjustments in shot composition or sound levels can significantly impact the overall mood and clarity of a scene.
Findings
Through this process, I found myself becoming more comfortable and familiar with camera work, particularly in choosing appropriate shot sizes for different scenes and emotions. I also gained confidence in using Adobe Premiere Pro, especially in organizing clips, applying transitions, syncing sound, and making basic color corrections.


Comments
Post a Comment