Interactive Design - Project 1: Website Redesign Proposal

14/05/2025 - 28/05/2025 (Week 4 - Week 6)
Shema Goldie Angwen / 0372129
Interactive Design
Bachelor of Design (Hons) in Creative Media / Taylor's University
Project 1: Proposal
Assignment Description:
You are required to select an existing website which you feel has several design and UX issue and prepare a detailed proposal for its redesign. The proposal should address the following key aspects:
Shema Goldie Angwen / 0372129
Interactive Design
Bachelor of Design (Hons) in Creative Media / Taylor's University
Project 1: Proposal
CONTENT LIST
INSTRUCTIONS
Assignment Description:
You are required to select an existing website which you feel has several design and UX issue and prepare a detailed proposal for its redesign. The proposal should address the following key aspects:
- Website Analysis:
Current Design Evaluation: Provide a critique of the current design,
focusing on layout, color scheme, typography, imagery, and overall
aesthetics.
User Experience (UX): Assess the site’s usability, navigation, accessibility, and responsiveness. Identify pain points or areas that could be improved.
Functionality: Evaluate the website’s performance, including load times, interactivity, and compatibility across different devices and browsers.
Target Audience: Describe the intended audience for the redesigned website and how the new design will better meet their needs.
Technical Considerations: Outline any technical updates or changes, such as optimizing for mobile devices, improving load times, or enhancing security features.


 src - This attribute specifies the path to the image.
alt - This attribute provides alternative text for the image, which is essential for accessibility
title - This attribute provides tool tip of the image in the browser

User Experience (UX): Assess the site’s usability, navigation, accessibility, and responsiveness. Identify pain points or areas that could be improved.
Functionality: Evaluate the website’s performance, including load times, interactivity, and compatibility across different devices and browsers.
- Redesign Goals:
Target Audience: Describe the intended audience for the redesigned website and how the new design will better meet their needs.
- Design Proposal:
- UX Enhancements:
Technical Considerations: Outline any technical updates or changes, such as optimizing for mobile devices, improving load times, or enhancing security features.
LECTURE NOTES
WEEK 4: WEB STANDARDS
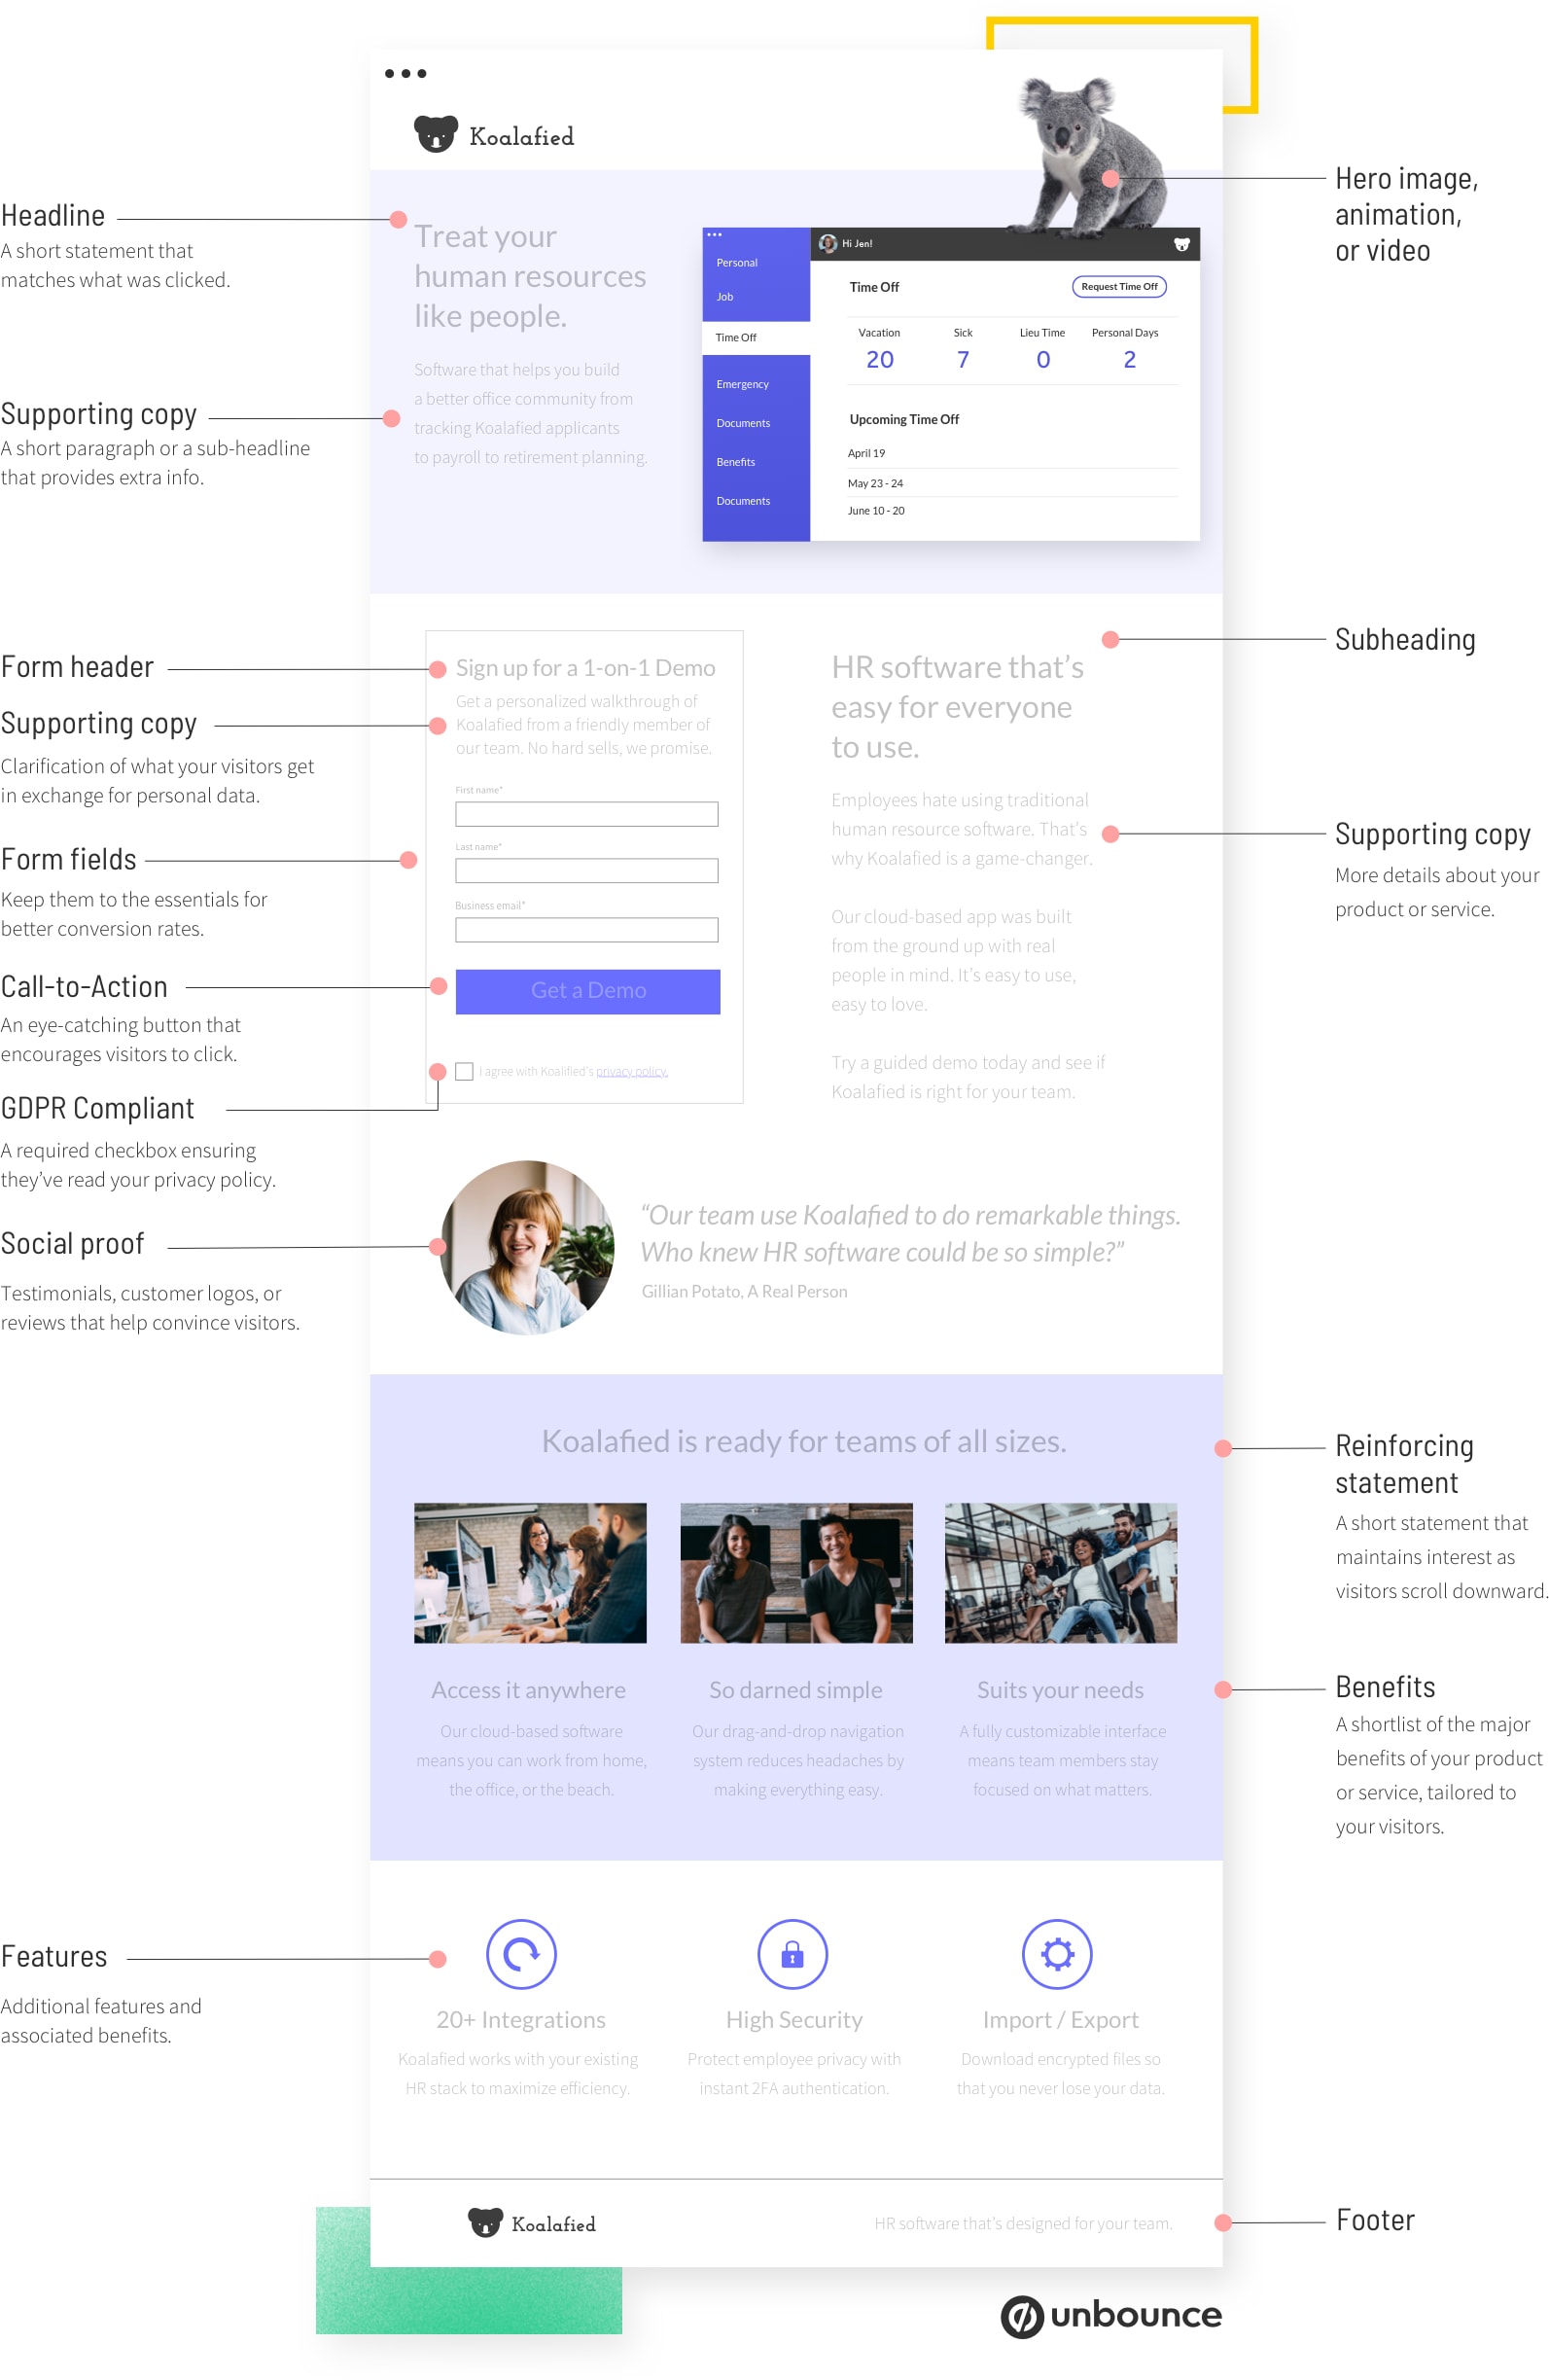
STRUCTURE OF A WEB PAGE

Figure 1.1: Anatomy of Landing Page. source: https://unbounce.com/photos/1.8_AnatomyofLandingPage.jpg
HTML
- stands for Hypertext Markup Language
- is made up of characters that live inside angled brackets (inside the bracket called as elements content)
- HTML elements are usually made up of two tags: an opening tag and a closing tag


Figure 1.2: Opening and Closing Tag, source:
Slides Given

1) <head>
- contain information about the page
- usually <title> element is found inside here
- placed before the <body> element
2) <body>
- everything inside here is shown inside the main browser window
- for image, list
- cannot have more than one <body> element in your document
3) <title>
- the content of the <title> elements is shown in the top of the browser (tab bar)
HTML HAS 6 LEVEL OF HEADINGS
- <h1> main headings -> the biggest heading
- <h2> subheadings
- .......... until <h6> (but <h5> and <h6> are rarely used)

PARAGRAPH
Surround the words that make up the paragraph with an
opening <p> tag and closing </p> tag.


- Ordered list: the list is numbered
- <ol> : The ordered list is created with the <ol> element
- <li>: Each item in the list is placed between and opening <li> tag and a closing </li> tag (the li stands for list item.)
- Unordered list: begin with a bullet point
- <ul> : The ordered list is created with the <ul> element
- <li>: Each item in the list is placed between and opening <li> tag and a closing </li> tag (the li stands for list item.)


Figure 1.6: Ordered & Unordered List,
source: Slides Given
- Nested List
-
for some complicated list, used when you want to create drop down menu (navigation). You can put a second list inside an <li> element to create a sub-list or nested list
(in lists, cannot add paragraph)
*normal flow: top to bottom, left to right
in Adobe Apps force line break (shift + enter) ->
in HTML is by <br> followed by content - single sider,
no need opening and closing tag
<hr> : creates a line across the page (has no closing
tag)
<br> : creates a line break within a block of text, so
the text will start on a new line
LINKS
Commonly type of links:
- Links from one website to another
- Links to one page to another on the same website
- Links from part of a web page to another part of the same page
- Links that open in a new browser window (tab)
Writing Links
- User can click on anything between the opening<a> tag and the closing </a> tag

Figure 1.7: Writing Links, source: Slides Given
ADDING IMAGE

Figure 1.8: Adding Image, source: Slides Given
alt - This attribute provides alternative text for the image, which is essential for accessibility
title - This attribute provides tool tip of the image in the browser
WEEK 5: ID AND CLASS ATTRIBUTE
Attribute: provides additional information
Extra Markup
- ID Attribute
- used to uniquely identify the element from other elements on the page
- no two elements have the same value for their ID attributes (otherwise the value is no longer unique)
- giving an element a unique identity
- Class Attribute
- same with id attribute but you can have several key elements
- Block elements
- Some elements will always appear to start on a new line in the browser window
- It is know as block level elements
- Example: <h1>, <p>, <ul> and <li>
- Inline elements
- Some elements will always appear to continue on the same line as their neighbouring elements
- It is know as inline elements
- Example: <b>, <i>, <em>, <a> and <img>
Figure 1.9: Block and Inline Elements,
Introduction to CSS
- CSS: Cascading Style Sheet
- allow you to create rules that specify how the content of an element should appear
- Example, you can set the background of the page is cream, all paragraphs should appear in gray using the Arial typeface, or that all level header should be in a blue, italic, Helvetica typeface
- *font: use links fonts. don't use yg installed in your computer because the viewer cannot see because only installed in your computer
- Order of Precedence:
- Inline Styles: Have the highest priority.
- Embedded Styles (within <style> tags): Take precedence over external stylesheets.
- External Stylesheets (linked via <link> tag): Have the lowest priority.
WEEK 6: UNDERSTANDING TYPE OF CSS SELECTORS
CSS Selectors
used to define which elements should receive specific styles, such as colors, fonts, spacing, and more.
1) Universal Selector: Selects all elements on the page.
* {
/* CSS styles go here */
}
2) Element Selector: The simplest type of selector, it targets HTML elements by their tag name (h1, h2, ul,
etc).
p {
/* CSS styles go here */
}
3) ID Selector: Targets an element with a specific id attribute. IDs must be unique within an HTML
document.
#my-element {
/* CSS styles go here */
}
4) Class Selector: Targets elements with a
specific class attribute. Multiple elements can share the
same class.
.my-class {
/* CSS styles go here */
}
5) Descendant Selector: Selects an element that is a descendant of another element. You can specify a hierarchy of elements to target. For example, to style all <a> elements inside a <div> with class
"container,"
.container a {
/* CSS styles go here */
}
6) Child Selector: Select elements that are direct
children of another element. To select only the
immediate <li> children of an <ul>, you can
use:
ul > li {
/* CSS styles go here */
}
7) Pseudo-class Selector: Selects elements based on their state or position in relation to other elements.
Common pseudo-classes include :hover, :active, :visited, :link, :focus, and :nth-child(n)
a:hover {
/* CSS styles go here */
}
8) Pseudo-element Selector: Selects parts of an element rather than the element itself. Common pseudo-elements include ::before and ::after, which are used to add content before or after an element.
p::before {
/* CSS styles go here */
}
Why There Are Many Selectors? To give web developers the ability to precisely target and style specific elements or groups of elements based on their structure, attributes, state, or position within the document.
Some key reasons why there are so many selectors in CSS:
1) Specificity:
Different situations may require different levels of
specificity when selecting elements. For instance,
you may want to style a specific element with an ID
differently from other elements with the same class.
The availability of various selectors allows you to
define the specificity you need.
2) Structure:
Web pages often have complex structures with nested
elements. Selectors like descendant selectors
(parent
element > child element) and sibling selectors
(element + adjacent element) enable you to target
elements within specific structural contexts.
3) Attribute-Based Selection:
You may want to style elements based on their
attributes or attribute values. Attribute selectors
like [attribute="value"] allow you to do this.
4) Pseudo-Classes and Pseudo-Elements:
These selectors help you style elements based on
their state or position within the document. (when
you hover, you want to change the appearance). For
example, you can style links differently when they
are hovered over (:hover) or style the first
letter of a paragraph (::first-letter) differently.
5) Responsive Design: Media queries, a type of
selector, enable you to apply different styles to
elements based on the user's device characteristics,
such as screen size, orientation, or resolution. This
is essential for creating responsive web designs.
(Different device, different layout menyesuakian
device. Work based on media queries, include several
breakpoints, when reach several dimensions, the layout
change based on different breakpoints)
6) Stateful Interactions: Selectors like
:focus, :active, and :checked allow you to style
elements based on user interactions. For example,
you can style a button differently when it's clicked
(:active) or style form elements when they are in
focus (:focus). (could give feedback).
7) Cross-Browser Compatibility: Different web
browsers may interpret and apply
CSS rules differently. Having a variety of selectors
allows developers to use techniques that work
consistently across different browsers. (sometimes
we need to input certain key to apply css rules
differently)
8) Ease of Maintenance: Depending on the
structure and requirements of a web page, certain
selectors may make CSS easier to maintain. For
example, using class selectors can make it simpler
to update styles consistently for multiple
elements.
9) Accessibility: Properly structured and
labeled HTML elements can be targeted and styled
using CSS selectors to improve accessibility by
providing styles that enhance readability and
usability for individuals
with disabilities. (Disabilities = for color blind.
For example: https://www.jpj.gov.my)
PROJECT
1
Website Redesign Proposal
Figure 2.1: Proposal Slides (PDF)
REFLECTION
Experience
Creating a website design proposal turned out to be more challenging than I initially expected. Analyzing and improving an existing website requires critical thinking and attention to detail, but I’ve come to appreciate that it as part of my learning process. Learning new Adobe software, Dreamweaver, and new things, HTML and CSS, wasn’t easy. I had to stay focused along the lecture session. Although it was sometimes overwhelming, the experience was also exciting because I was learning something completely new. In the end, I was able to keep up with all the tasks and gain understandings of the HTML and CSS material.
Observation
I noticed that many concepts from my typography class are directly applicable to web design. Elements such as margins and alignment play a crucial role in creating a visually appealing and user-friendly interface. I also realized how important it is to test website designs across different browsers and devices to ensure consistency, functionality, and responsiveness.
Findings
I learned about the purpose and structure of a landing page, how to design a wireframe, and the importance of placing the company logo correctly in web design.


Comments
Post a Comment